Want to be familiar with Tenda Wi-Fi router installation? Don’t sweat it! This brief guide will assist you. You explore everything from unboxing to installing it effortlessly. Additionally, before you begin the installation, locate a ventilated place to position your router where signal strength is better is necessary. The rest we will discuss in this post, so stay connected!
How to carry out Tenda Wi-Fi router installation ?
Further, to proceed with the installation of the Tenda networking device, it is necessary to check the product and available components carefully. In this section, we highlight the detailed steps for carrying out the Tenda router installation, so take a look:
Unpack the components
When you purchase a new Tenda router, start by unboxing it and carefully inspecting all components for any damage. Follow these steps to ensure everything is intact:
- Firstly, open the box and remove the plain film or outer cover from the router and other components.
- Now, check the hardware of the router as it is not cracked or broken.

- Look for the user documents provided in the box.
- After that, join the antennas to the router (if given) by considering the user guide.
- Check that a power adapter is provided or you need to buy it separately.
Learn simple steps for how to install Tenda wifi router
- First and foremost, after unboxing the router, must gather all the things in one place.
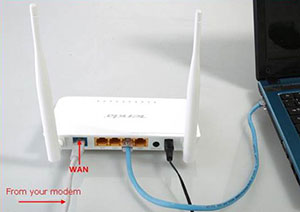
- Now, connect the modem (WAN Port) and router (LAN Port) using an ethernet cable.
- If your networking device has an in-built modem, then there is no need for a separate modem.
- Afterward, plug in the router to the power source using an original adapter.
- Further, release the power supply and check the power LEDs on the networking devices are turned on.
- Finally, you are done with the Tenda Wi-Fi router installation and can relocate it anywhere in a good signal range.
How to test the connection?
In the above sections, you learn how to install Tenda wifi router. When you are ready with the router installation, then it is necessary to check the router connectivity. For this, you need to access the admin panel of the router first which you can enter using a web address or the Tenda wifi app. In this section, we shed light on the primary steps to test your router’s connection, have a look:
- Initially, link your computer to the Tenda wifi’s network.
- After that, open the web browser and type in tendawifi.com or 192.168.0.1 IP address in the URL bar.
- Next, a login window appears to you.

- Here, key in the default username and password on the login window.
- Now, you are presented with the complete router control panel where you can check the connection type, bandwidth, connection status, and more.
- At last, this will show that the Tenda router installation goes right and the router works well.
Wrapping up
All things considered, the given information will assist you with the detailed information regarding Tenda Wi-Fi router installation. In addition to this, you also explore the connection testing after installing your networking device. Hope, you find this brief guide helpful in completing the router installation.